click below to return for website

----------------------------------------------------------------

Wall Art

Friday, 13 August 2010

Image masking techniques in design


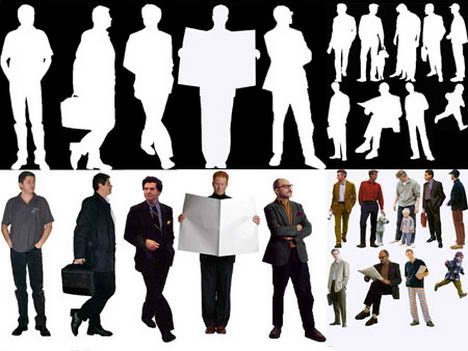
When it comes to presentation, inserting raster images of human and trees gives it an overall feeling of liveliness. The whole idea is to counter the mono tone feeling of line drawings, especially when it comes to presenting your work to someone who is not in the architecture line of field.
I have included a few of my collection in jpeg available for download at the end of this article. Each image shows a person on a white background and another one with a cut-out version. For those who are still relatively new to Photoshop or this is your first year as an architecture student, a step by step tutorial on how to insert the image into your presentation boards is available.
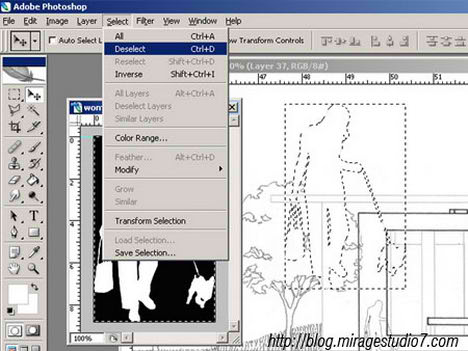
(1) Select (ctrl + a ) then copy (ctrl + c) the image and paste (ctrl + v) it into the presentation board from the source.
Photoshop Image Masking tutorial
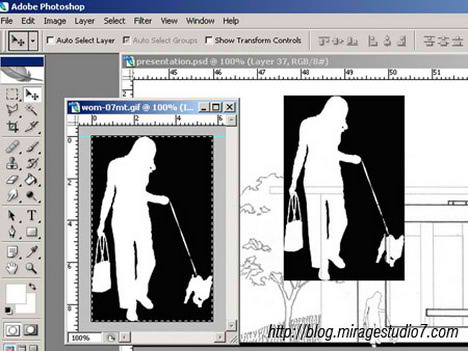
(2) Select the magic wand tool (press W) then click on the black area, to select multiple area hold down the ctrl key and click on multiple areas.
Photoshop Image Masking tutorial
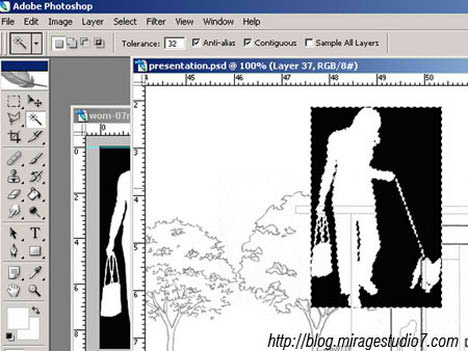
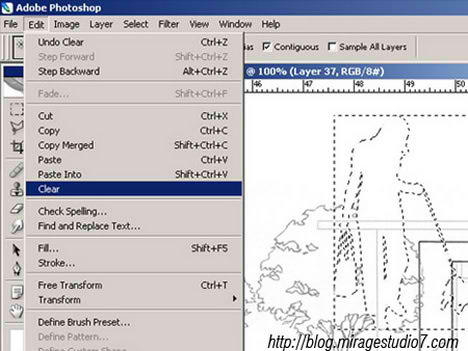
(3) Select all of the black colour areas then delete (press the delete key) or go to “edit” then select “clear” to delete the selected areas.
Photoshop Image Masking tutorial
(4) Deselect the area by pressing (ctrl + d) or go to “select” then “clear”.
Photoshop Image Masking tutorial
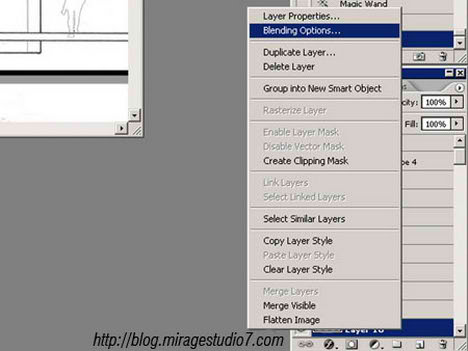
(5) In the layer toolbox, right click on the selected layer then choose “Blending Option”
Photoshop Image Masking tutoria
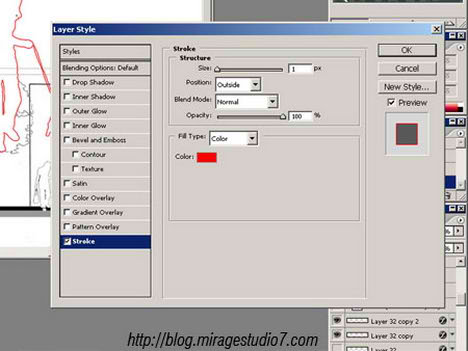
(6) In layer style dialog , under the styles category select “stroke”, then put the line thickness to 1. By default the colour is red, change the colour to suit your presentation boards.
Photoshop Image Masking tutorial
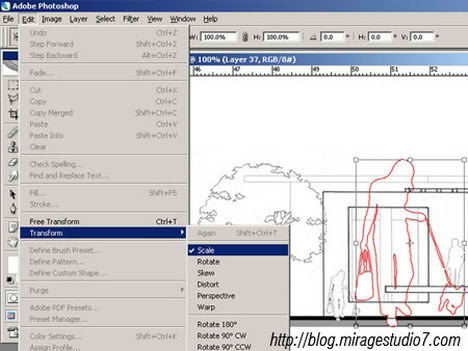
(7) Resize (ctrl + t) the image to scale, go to “edit” then “transform” and select “scale”
Photoshop Image Masking tutorial
Creating a “cut-out” or “floating image” of any of the image objects supplied below is a simple 7 step process. The step by step tutorial above gives an overview of the whole process using Photoshop. For cut-out version of trees browse to the previous post – Architecture Trees Sketches
Click here for a higher resolution version- Raster Image Female. Source of Image hot link from Architecture Blog
raster image female photoshop
Click here for a higher resolution version- Raster Image Male. Source of Image hot link from Architecture Blog
raster image male photoshop
Related Posts with Thumbnails

Thursday, 20 May 2010

Colour Scheme and Digital Printing Guide

Jpeg or Tif?
: The best file format would be tif, file format like jpeg compress the picture’s color and pixel resolution and this can cause color shifts and blurriness. Unlike the format tif, it preserve the color and sharpness of your pictures by not compressing it, which on the other hand has its down side, for example images in tif format is bigger in term of bytes compare with the jpeg format, thus taking up more storage spaces.

Just for your information, the compression process removes all of the colours that are not visible to the human eyes. A good example would be an image of sun set captures with a digital camera and saved in RAW mode or Tiff format, the image contains ultra-colours not are visible to the human eyes. Compressing the image removes these invisible colours.

If it is not visible, then why do people still uses Tiff or RAW format when taking pictures? Well, these invisible colours are visible to other species like cats and dogs, who knows they might be conducting some experiment with the animals, or studying the atmosphere of certain planets.


Dpi settings should I use when composing my presentation boards / 3ds perspective?
: The default dpi for a computer monitor is 72dpi/inch which is sharp enough displaying images on the screen. But then when it comes to compiling your presentation boards, to make out the best of it you should use 300dpi/inch as your default settings in photoshop. Why 300dpi/inch and not 100 or 150dpi/inch? Well, most printer are optimize to print resolution of 300-600dpi/inch at its best, it would be a waste not to harness the maximum permormance of the printer.


RGB or CMYK?

RGB is the normal color scheme used in computer graphics, while CMYK is the standard for printing color images. Because the computer screen displays light, the more colors that are added, the more light is added, thus the lighter your resulting color. Because the CMYK color scheme is used in combining inks, the more colors you combine, the darker your resulting color.

You most likely won’t notice this kind of color shift in a color photograph. It is more likely to happen if you pick a very rich, vibrant color for a background or some other element of your layout. It probably won’t look bad, it just won’t look exactly the same. But it may not be noticeable at all either. In any event it will look spectacular compared to a piece printed on an inkjet printer.

The best solution is to use the CMYK colour as the default settings. Using RGB colour and then convert it to CMYK colour for printing is a bad move, due to the fact that conversion from RGB to CMYK then to lose some colour data that might effect the final output of the image.

Monday, 3 May 2010

Customising 3ds max for quick render!

I do remember, I was editing render setting for quick render while doing my major project in BA. When I saw 3ds Max 2011, I can see development of CAD technology from editing old style complicated editing to open, simpler and specific material editing. Lighting is also more realistic… very easily used for films and special FX with quick renderer.

The main trick of customising view is, scene exterior walls should be imported from AutoCAD to 3d max through .dxf format. Extrude the walls and make all windows. Import this scene to .3ds format and again import it to 3d max for creating interior in to the scene. This will reduce the poly lines which are generated while doing external walls, which consumes lot of memory while rendering, and it takes lot of time for generating view.

New slogan for max will be ‘heavy file = export .3ds +import to 3ds max – rendering time’

Saturday, 1 May 2010

Ron Arad exhibition 2010

Recently I visited Ar. Ron Arad’s exhibition which was at Barbican Art gallery. I can define the exhibit was Bold, experimental and inventive.

I clicked few interesting chairs and other products from his design, the process he develops was amazing and gives new dimensions to young designers.

Monday, 8 February 2010

New approach in retail design

In last 6 months there are drastic changes happening in retail design, especially in London area. As UK is not seems to be coming out of recession crisis and stores are improving the user experience, I can see many stores are placing customer experience representatives in the store, who helps the customer to approach to the specific products in store.  
I have seen this system in India, but so far, retail shops of London were know for independent shopping experience and there was a very big disadvantage of this system, because many people were very shy to take in-store help and as a result store actually fails to serve their customer for better profit and for selling unlisted item for customer. 
Now due to these kinds of representatives, store is actually trying to understand psychology of customer and sell multiple products by showing better price match than it was before! This also solves the purpose of unemployment which UK is facing very badly at the moment.